
Appearance
AdminConfigure an activities module
An Activities module lets users log activities (continuing education, professional development, and similar) and submit them for review. You create one from Content Management → Contents (choose Activities), then attach it to a program step. Its settings are split across two tabs: Content Configuration (the form and how it appears) and Completion & Review (what counts as complete).
Content Configuration tab
Defines the module's identity, the form users fill in, and any custom columns shown on the activities tables.
Basic content info
The top of the tab holds the module's identity and a draft-saving switch.
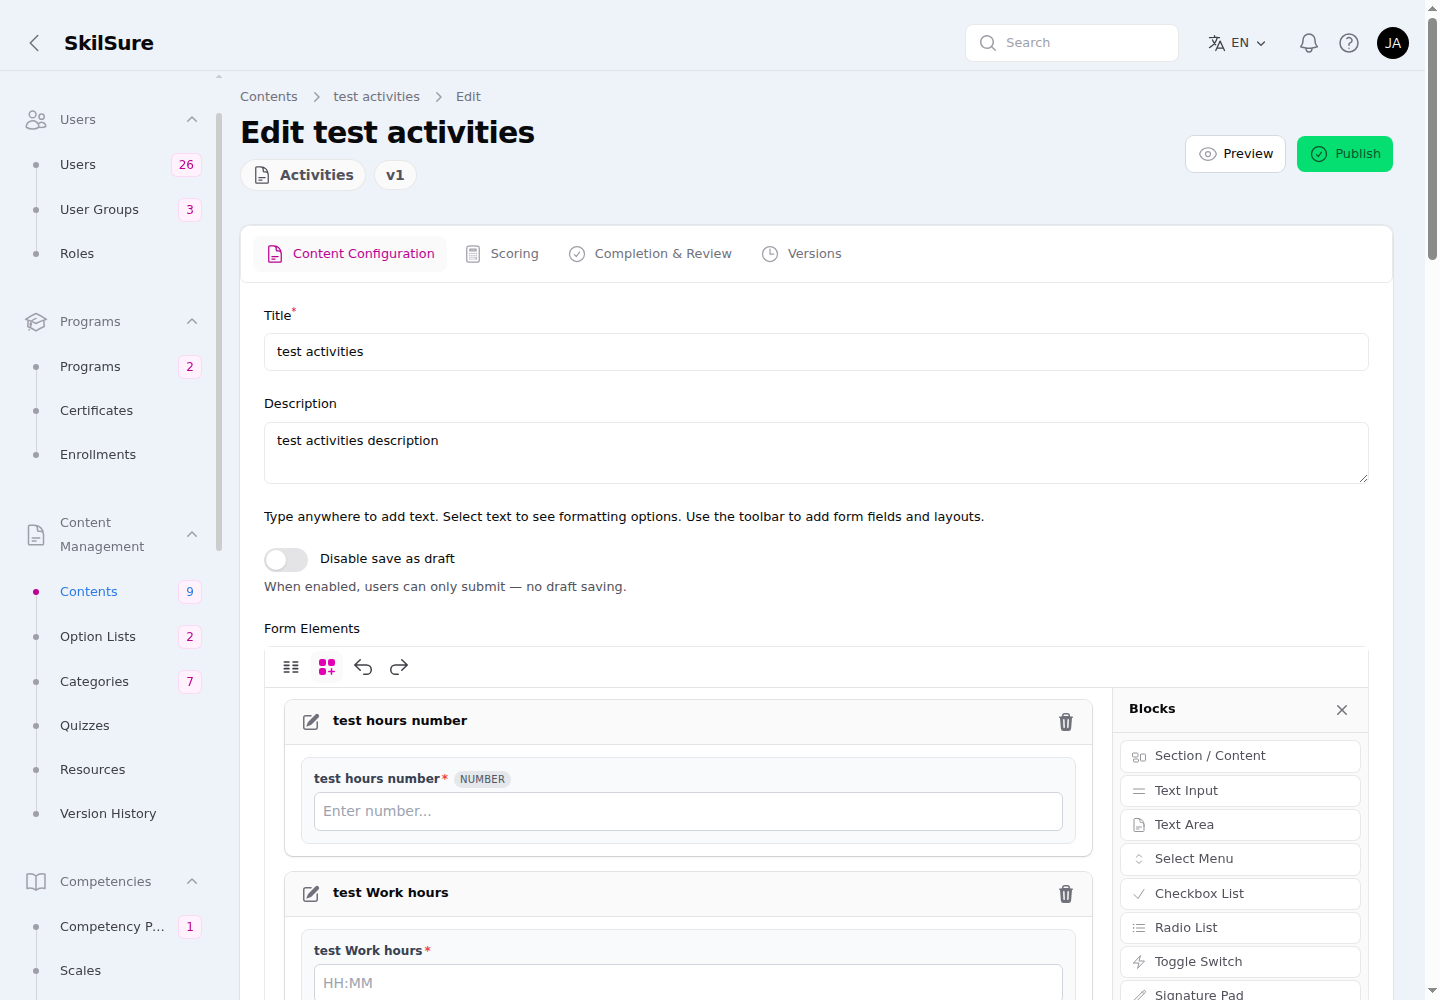 Content Configuration. Title and description identify the module; below them sits the form builder.
- Title — the module's name (required). It's used in lists and reports.
- Description — an optional summary of the module.
- Disable save as draft — off by default. When on, users can only submit an activity — they can't save it as a draft to finish later.
Form Elements
The Form Elements builder defines the form a user fills in when they log an activity. Type anywhere to add text, and use the Blocks panel to drop in fields and layouts.
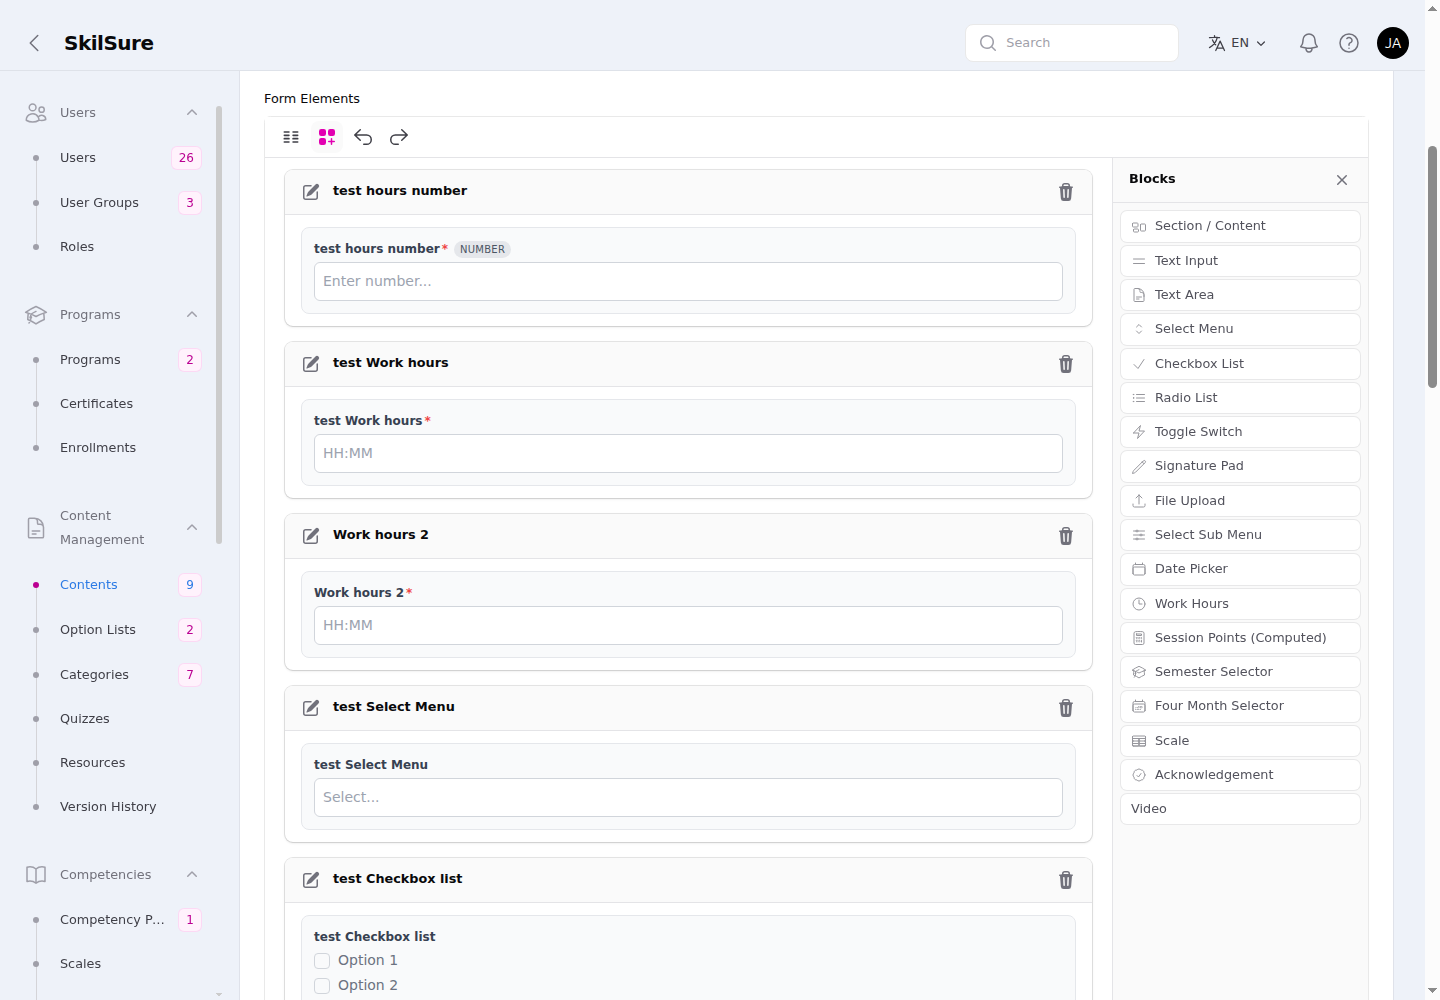 Content Configuration → Form Elements. Drag blocks from the panel on the right; click a block to configure it.
- The toolbar toggles between a list and a grid layout and offers undo/redo.
- The Blocks panel lists every element you can add — for example Text Input, Text Area, Select Menu, Checkbox List, Radio List, Toggle Switch, Signature Pad, File Upload, Date Picker, Work Hours, and Scale, plus layout/content blocks like Section / Content.
- Click any block already on the form to edit its label, requirement, and options. The fields you add here are what activity completion rules and custom columns can read.
Reused across modules
The same form builder powers other form-based content (forms, learning portfolios). Fields like Work Hours, File Upload, and Date Picker share the same options wherever they appear.
Date Picker — limiting dates relative to today
A Date Picker block can restrict how far its date may reach from the current date. Both switches are off by default:
- Limit max date to current date — blocks future dates, so the latest a user can pick is today.
- Limit minimum date for specified duration from current date — sets the earliest pickable date to a span before today (a length + unit, e.g. 12 Days → nothing older than 12 days ago). Combine the two to pin a field to a rolling "recent" window.
They apply everywhere the Date Picker is used (activity forms, learning-portfolio phase forms, and standalone forms), in both the admin and user views, and are enforced both in the calendar and when the form is submitted. When a field also has a fixed minimum/maximum date or is bound to a program's cycle/period dates, these switches only ever tighten the allowed range — they never widen it.
"Today" is the member's own local date, not the server's. A record dated today stays valid after it is saved: the member can reopen it, edit it and submit it later the same day without the date being rejected.
Work Hours — showing an empty value as "0h 0m"
A Work Hours block shows an empty box by default when no hours have been entered. Turn on Enable display empty/0 work hour as ‘0h 0m’ (just above Enable Dynamic Combined Minimum) to show an empty or zero value as 0h 0m instead.
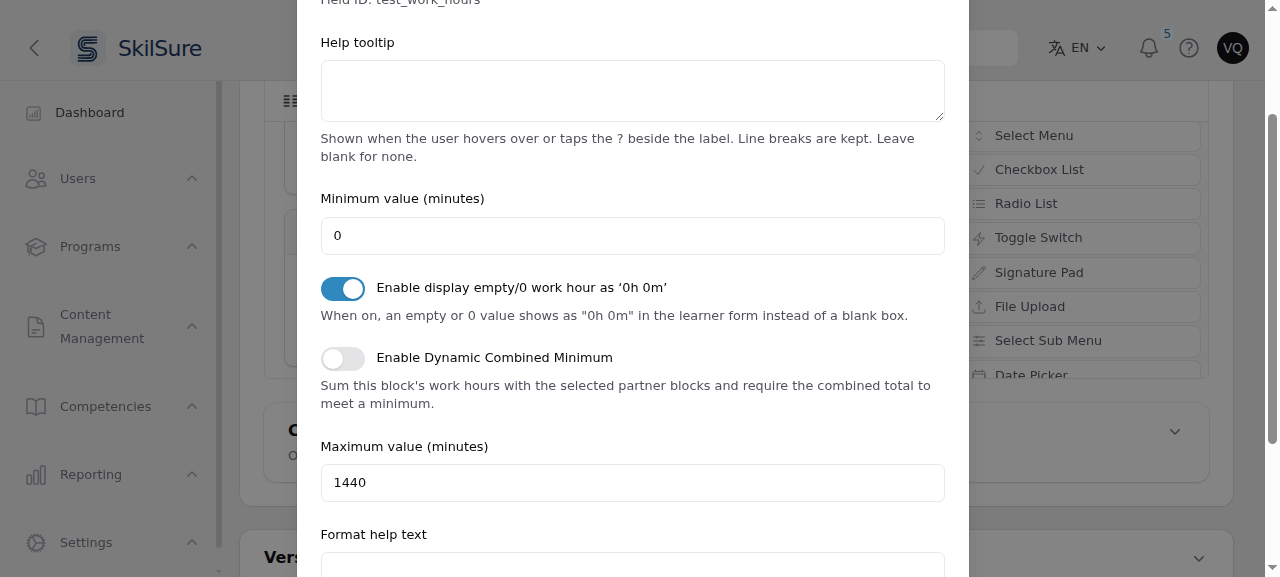 Content Configuration → Form Elements → click a Work Hours block.
It applies wherever the block appears for members to fill in: standalone forms, activity forms, and learning-portfolio phase forms, including the Edit goal window. While the member is filling in the form, an empty box also reads 0h 0m.
Read-only displays show 0h 0m only for a saved value of 0. This covers read-only copies of the form, a goal's View window, submission details and exports. A field the member never answered still shows as empty (—).
On a Required block with no Minimum value, a field the member never touched counts as 0 hours. It is accepted on submit and saved as 0, and a draft keeps it empty until the member submits. If the block has a minimum, 0 is below it: an untouched field, or one where the member types 0, is not accepted and shows "must be at least N minutes". Without this setting, a Required block always asks for a value.
The text "0h 0m" is fixed and is not available in Custom Text, because members can type it as a real value. The block's other member-facing text (the example placeholder and the format, minimum and maximum messages) can be reworded in Custom Text.
Relating two date pickers
When a form has two dates that belong together — a start and an end, a course date and a completion date — you can tie them to each other so the pair can never be filled in the wrong order.
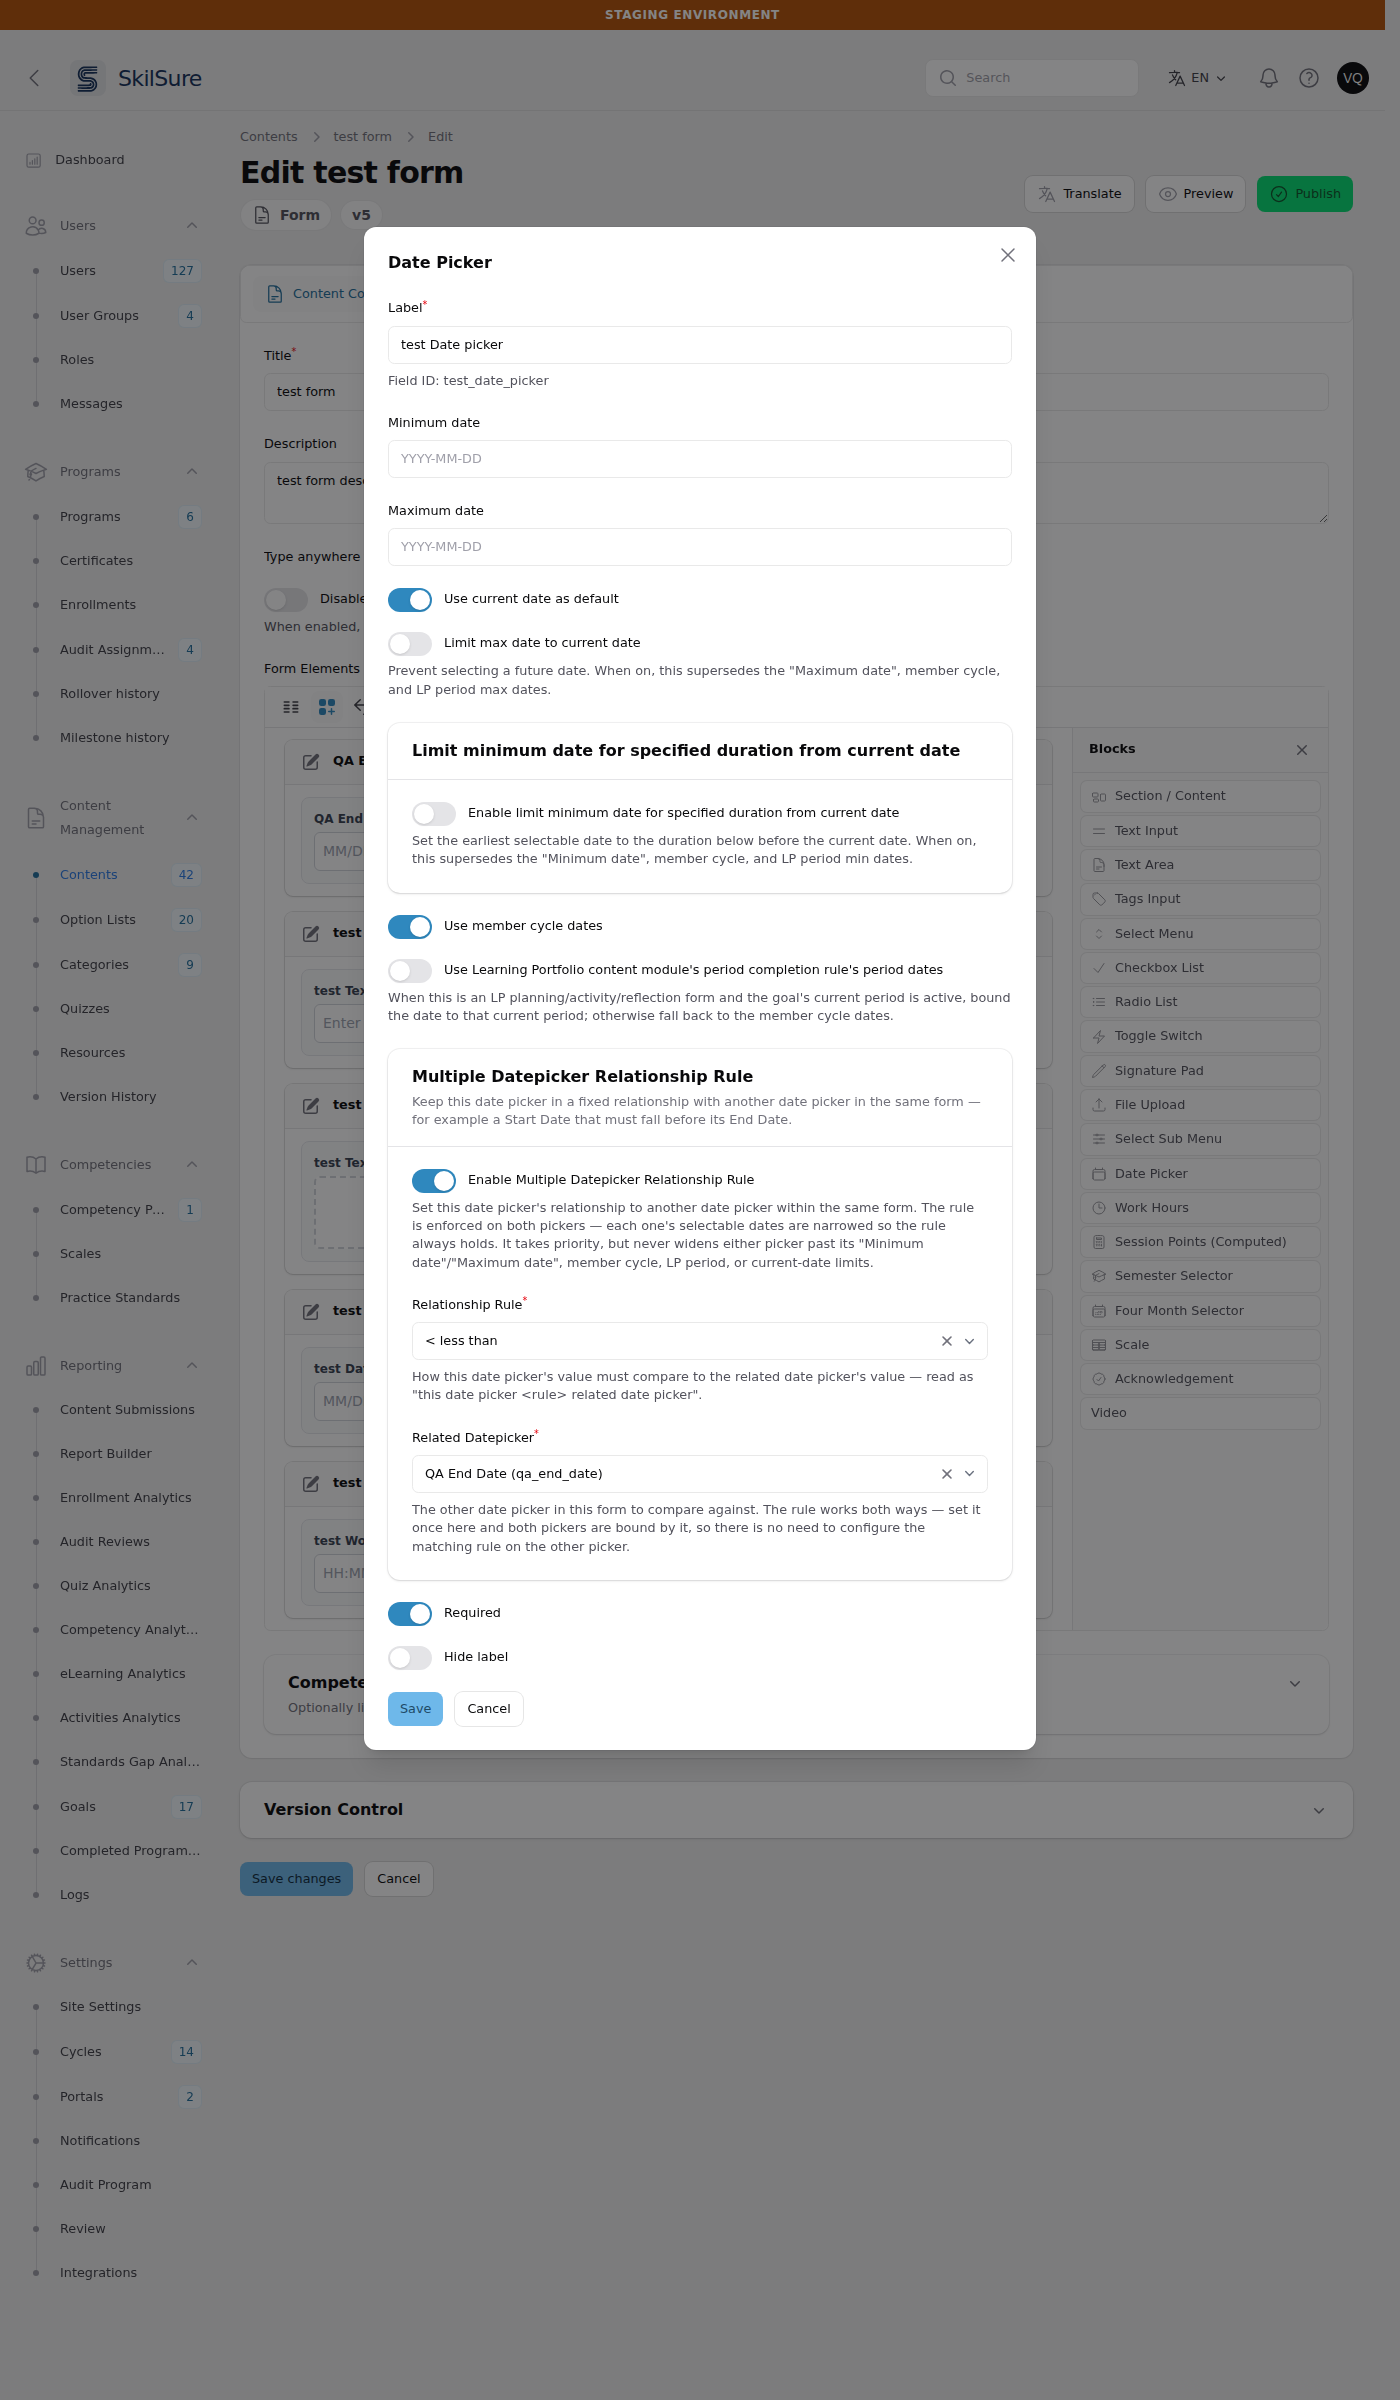 Content Configuration → Form Elements → click a Date Picker block. The relationship section sits just above Required.
- Turn on Enable Multiple Datepicker Relationship Rule.
- Pick a Relationship Rule — < less than, <= less than or equal to, = equal to, >= greater than or equal to, or > greater than. Read it as this date picker <rule> the related date picker.
- Pick the Related Datepicker — the list offers the other Date Picker blocks on the same form. A picker is never offered as its own partner.
Set it once, on either picker
The rule works both ways. Setting Start Date < End Date on the Start field also stops End Date being moved before Start — you do not add a matching rule to the other picker.
The rule takes priority over the field's other date settings, but it can only ever narrow what a user may pick — it never widens a picker past its own Minimum date / Maximum date, member cycle dates, LP period dates, or the current-date limits above. If the two pickers' own limits make the rule impossible to satisfy, the form reports the problem on submit rather than silently accepting a pair that breaks the rule.
The wording a user sees when a pair breaks the rule can be reworded per language on Settings → Custom Text under Forms.
Activities Table Custom Columns
Add your own computed columns to the activities tables — for example a running total of hours, or the options a user selected.
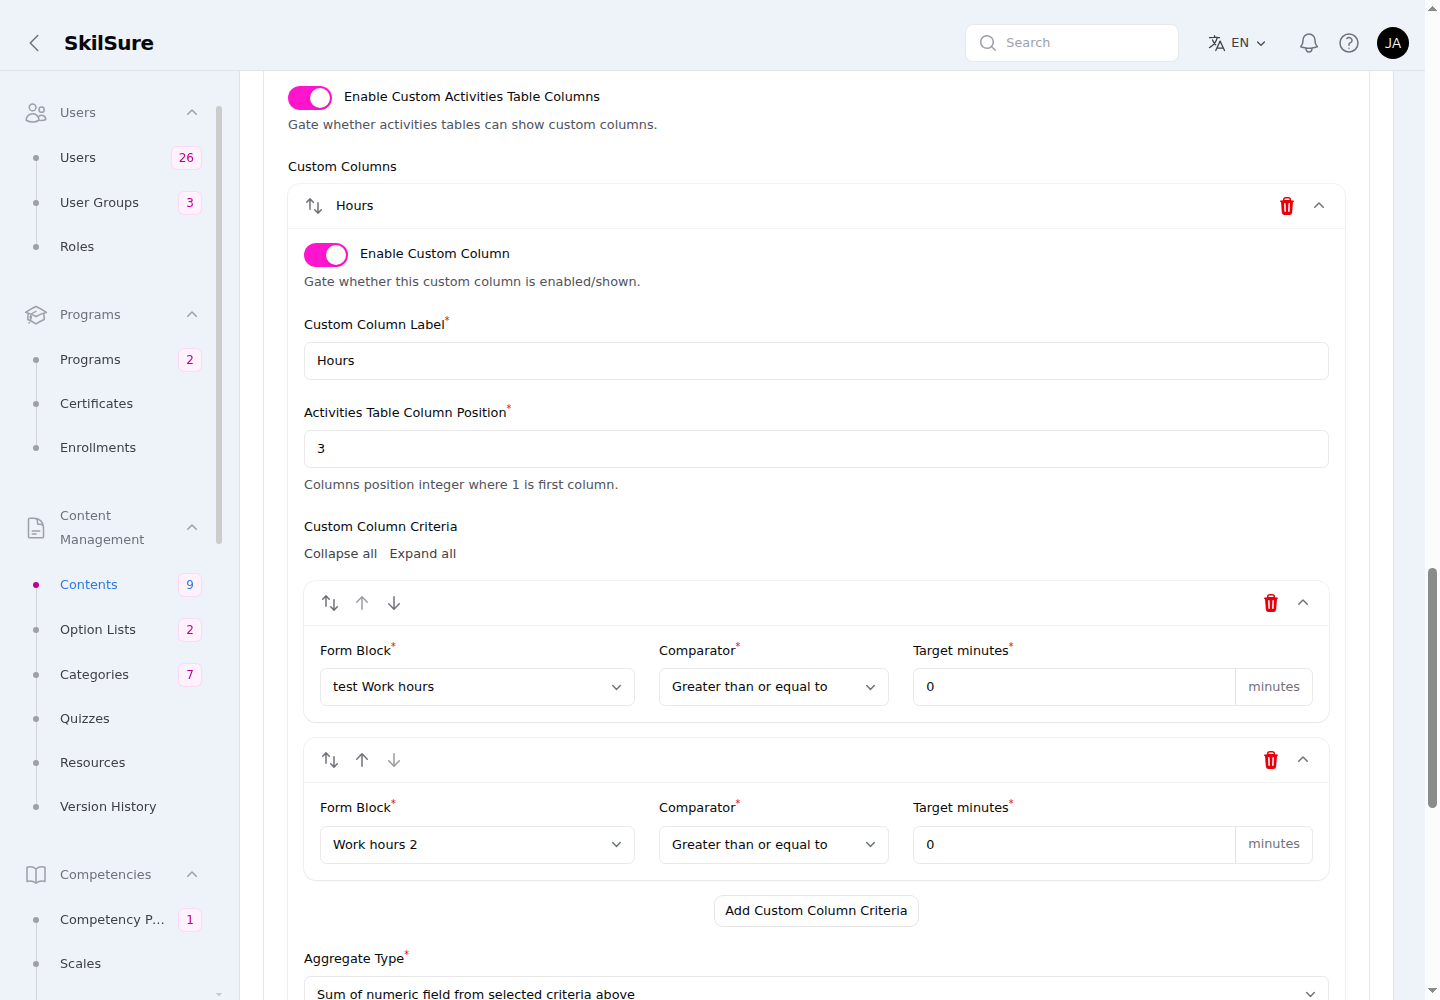 Content Configuration → Activities Table Custom Columns. Each column defines a translatable label, a position, the criteria it reads, and how it aggregates.
- Turn on Enable Custom Activities Table Columns.
- Add a column and set:
- Custom Column Label — the column heading (translatable per language).
- Activities Table Column Position — which visible column it becomes (1 is the first column; the count covers the default-visible columns — Date, Description, Status — plus custom columns, so columns hidden by default like Type or Create Date are skipped).
- Custom Column Criteria — which form blocks the column reads.
- Aggregate Type — either sum a numeric field (work-hours formatted) or show the selected option list value (the distinct options chosen).
- Aggregate Criteria — the specific field(s) to aggregate.
The same column appears across the user's activities table, the admin Activities Analytics table, and the Completed-Program export PDF and CSV.
Activities are listed oldest-first
The user's activities table is sorted oldest-created first, matching the order used in exports.
Availability
The Availability section controls the dates an activity can fall in and where they come from.
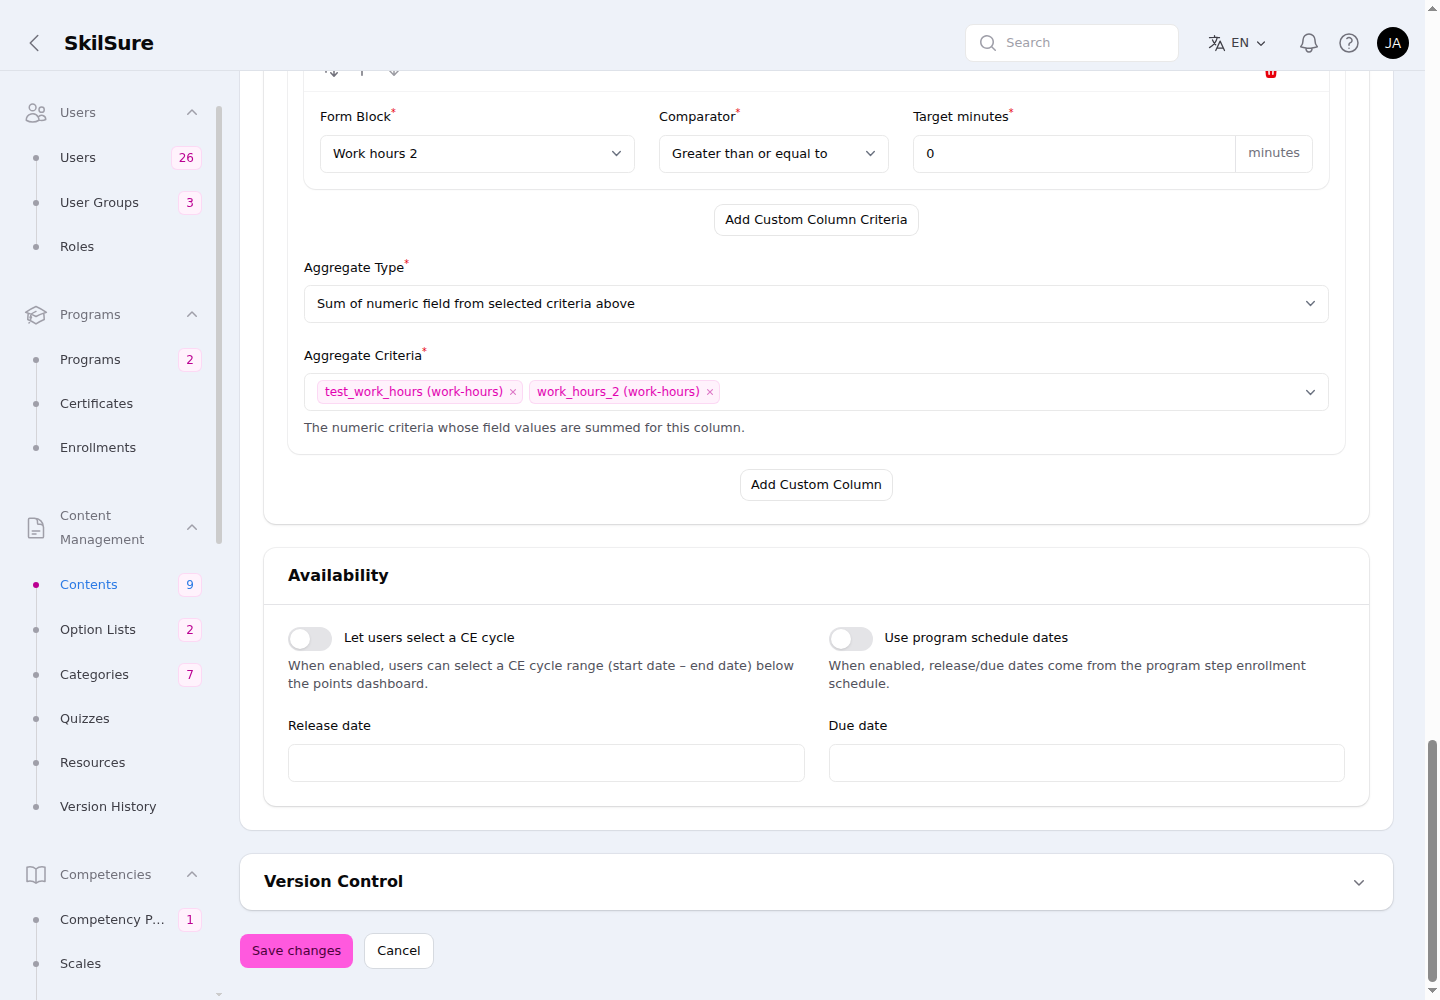 Content Configuration → Availability. Choose whether users pick a CE cycle and where release/due dates come from.
- Let users select a CE cycle — when on, users can pick a continuing-education (CE) cycle range (a start–end date range) on the activities step. Off by default.
- Use program schedule dates — when on, the activity's release and due dates come from the program step enrollment schedule. Off by default.
- Release date / Due date — set fixed dates here when you aren't pulling them from the program schedule.
Completion & Review tab
Defines what a user must do for the step to count as complete, and whether submissions go through review.
Submission Requirements
The Submission Requirements section sets how many activities a user must log and guards against bad submissions.
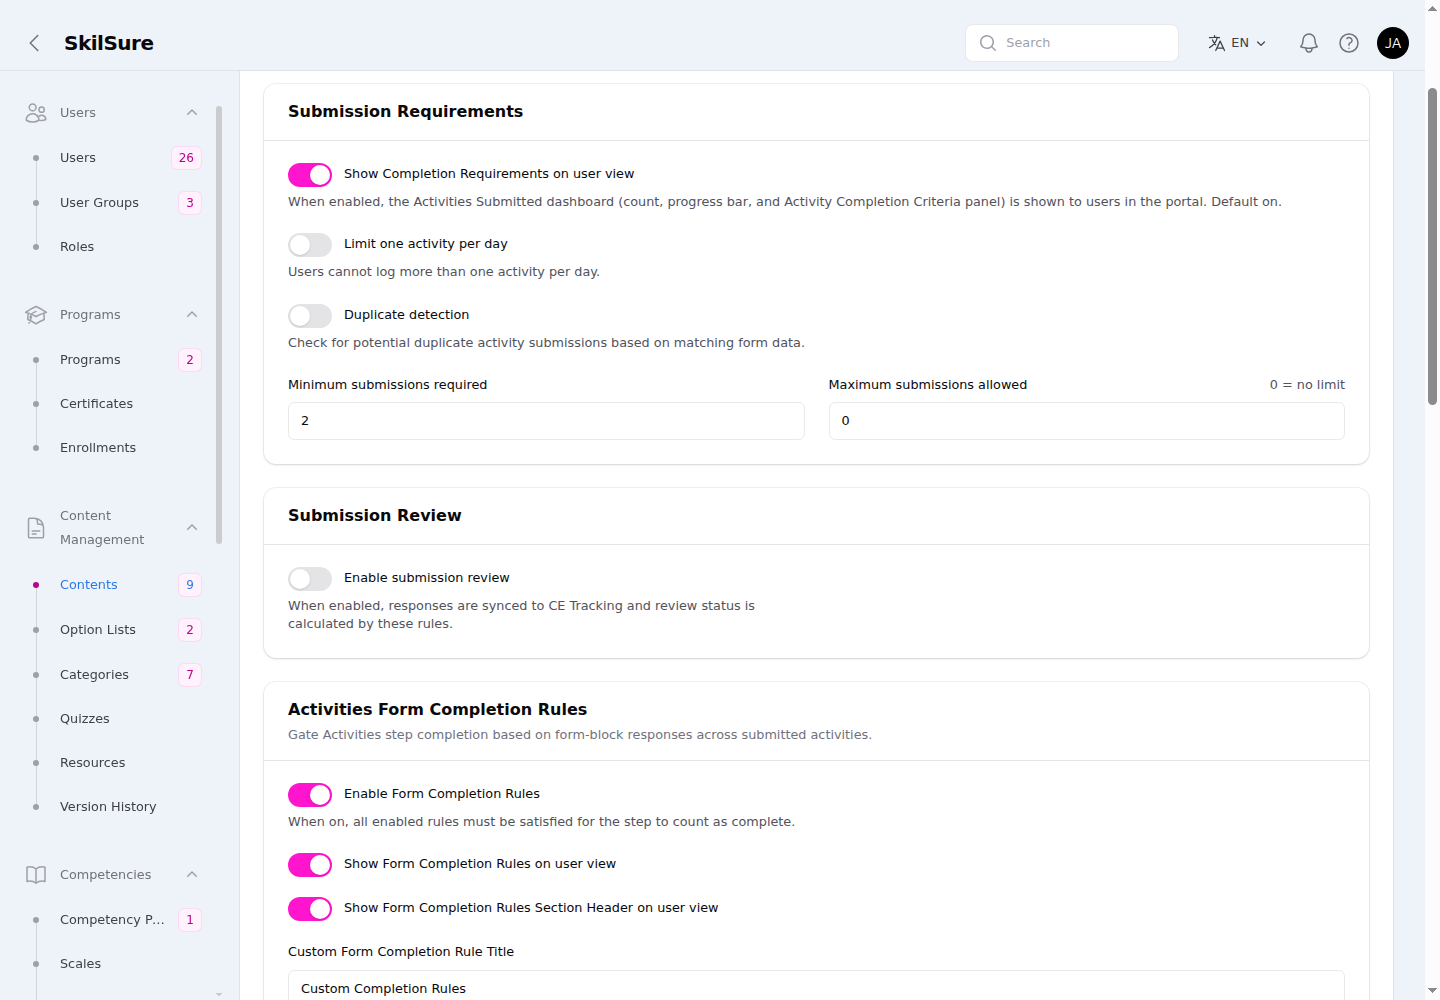 Completion & Review → Submission Requirements and Submission Review.
- Auto-complete — on by default, and the behaviour every existing step already has: the step completes itself the moment the requirements below are met. Turn it off to make the user declare they are finished — see Require a manual Submit.
- Show Completion Requirements on user view — on by default. Shows the Activities Submitted dashboard (count, progress bar, and Completion Rules panel) to users.
- Limit one activity per day — when on, a user can't log more than one activity per day. Off by default.
- Duplicate detection — when on, checks for potential duplicate submissions based on matching form data. Off by default.
- Enable Browser-side Submit Validation — on by default, and the behaviour every existing step already has: the browser checks the required fields before Submit Activity sends anything, and the button stays greyed out until the form is complete. Turn it off if users report that clicking Submit does nothing — every click then reaches the server, which highlights any missing or invalid fields inline. The activity is validated either way.
- Show Draft Warning — off by default. Turn it on to remind users that a draft doesn't count until it's submitted: a note under the Submit Activity and Save Draft buttons, and a banner above the activities table while they still have unsubmitted drafts. Drafts carried over by a data import don't raise the banner. The wording of both is editable in Custom Text.
- Minimum submissions required — how many activities the user must submit for the step to count as complete.
- Maximum submissions allowed — caps how many activities a user can log;
0means no limit.
Require a manual Submit
With Auto-complete off, meeting the requirements is no longer enough — the step waits for the user. Once the requirements and any Activities Form Completion Rules are satisfied, a Submit button appears on their Activities step; until then it stays hidden, so they can't submit early.
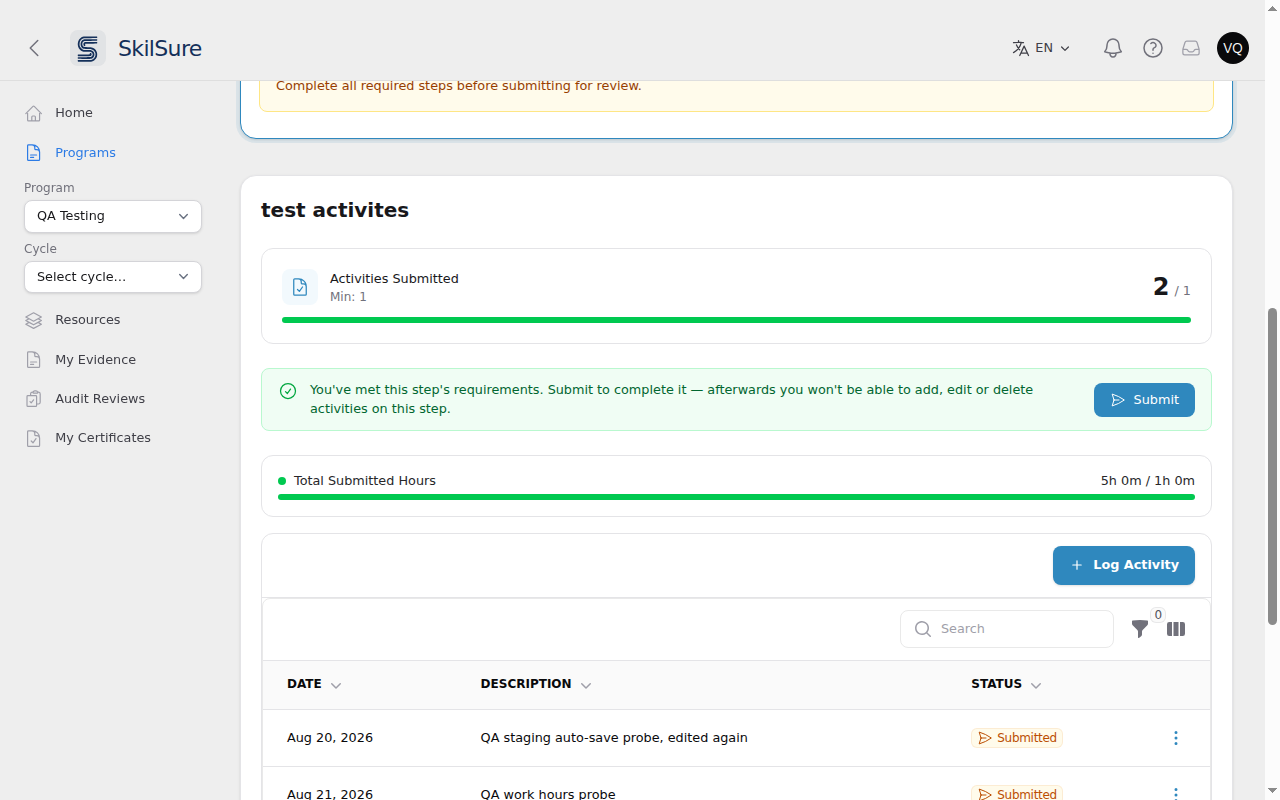 What the user sees once the requirements are met and Auto-complete is off.
Submitting locks the step: no further activities can be logged, edited or deleted, and the step stays complete even if the underlying numbers later change (for example if an activity is removed). The user is warned of this before they confirm.
Reopening a submitted step
If someone submits too early, reopen the step from the user's enrollment: Program Enrollments → the enrollment → the step's ⋮ menu → Mark In Progress. That clears the submission, returns their activities to draft so they can edit them, and re-derives completion from the requirements. The Submit button comes back once they have met them again.
To let users do this without you, see the two per-step toggles on the Access tab: Enable Allow User Reopen Step for a finished step, and Enable user Reopen Activity to unlock a single approved activity while the step is still in progress.
Turning Auto-complete off on a step users have already finished
Anyone whose step was already complete stays complete — switching the setting does not undo work they have finished. But because they never pressed Submit, their step is not locked: it stays complete only while it still meets the requirements. If such a user deletes enough of their activities to fall below them, the step returns to In Progress and they finish it with the Submit button, as everyone else now does.
Users who have pressed Submit are unaffected: their step stays complete whatever happens to the numbers afterwards.
Auto-complete only applies to steps built with the current form builder. It has no effect on older Bolt-form Activities content, which completes on response counts alone.
Submission Review
- Enable submission review — off by default. When on, submitted activities are synced to CE Tracking and their review status is calculated by the review rules, so a reviewer or administrator approves them before they count.
Administrators review pending activities from Reporting → Activities Analytics. See Review activities.
Completion rules and their labels
The Activities Form Completion Rules section defines the totals a user must reach (such as a minimum number of activities or work hours).
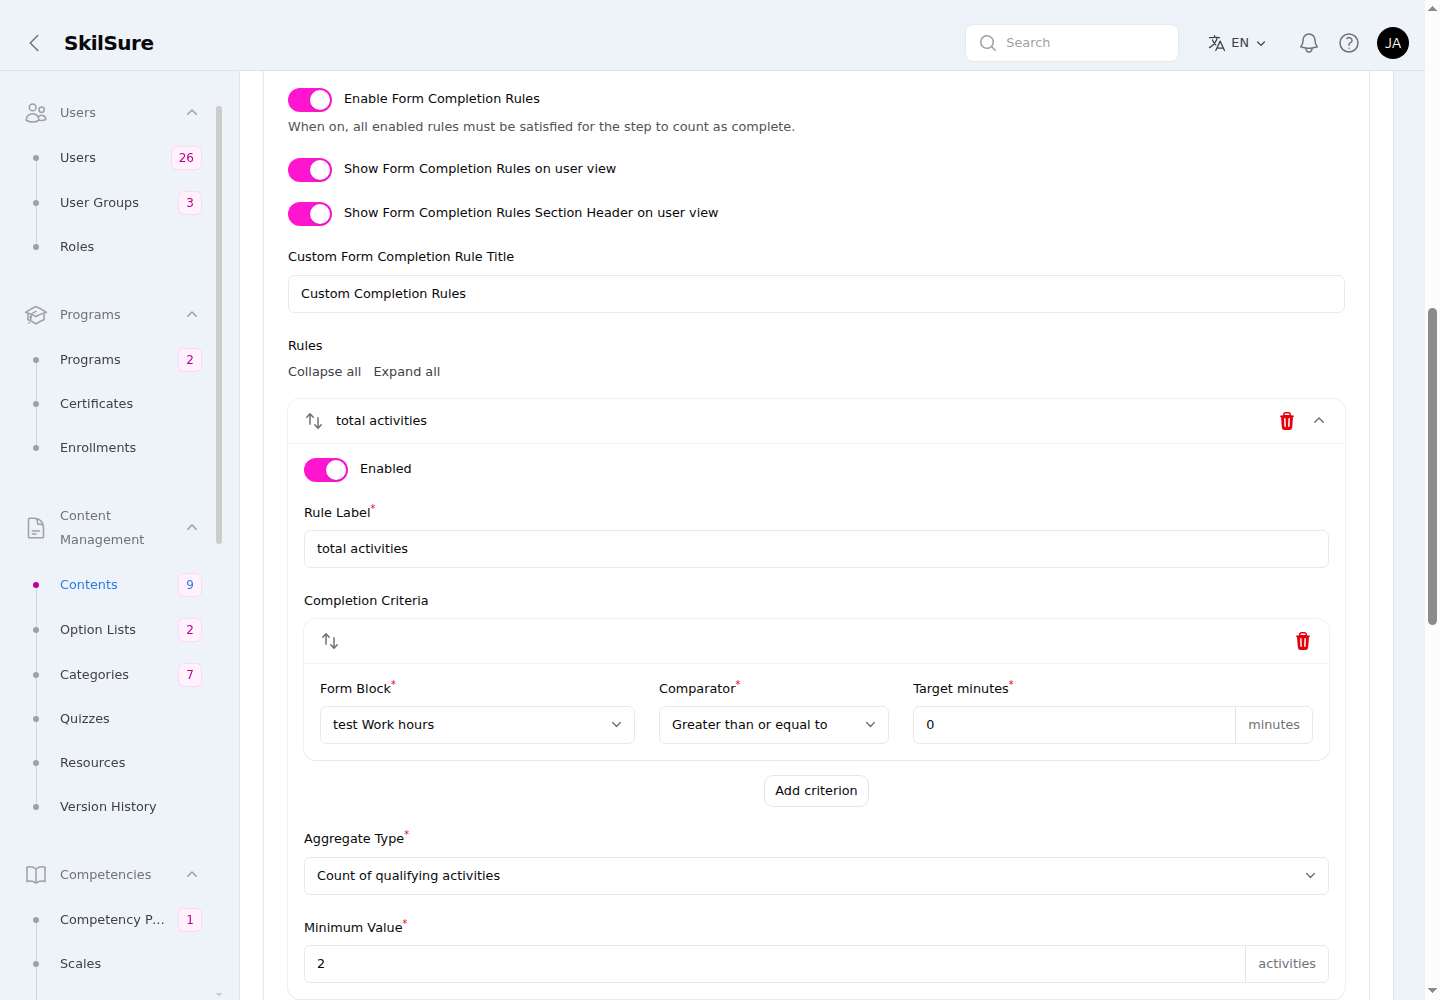 Completion & Review → Activities Form Completion Rules. The section header and each rule label are translatable, so users see them in their own language.
- Custom Form Completion Rule Title — the heading shown above the rules on the user view. It's translatable per language; if you leave it blank, users see the default "Completion Rules".
- Rule Label — each rule's label is also translatable per language. The user and admin views show the label for the current language.
- Each rule has its own completion criteria (form block, comparator, target) and an aggregate type (e.g. count of qualifying activities, or sum of work hours) with a minimum value.