
Appearance
AdminProgram enrollments
A Program Cycle Enrollment is a single user's participation in one program cycle. From here you can see and intervene in their progress, step by step.
Open an enrollment
Open Programs → Enrollments. The Program Cycle Enrollments list shows every enrollment across your programs, with status, completion, and step-level detail.
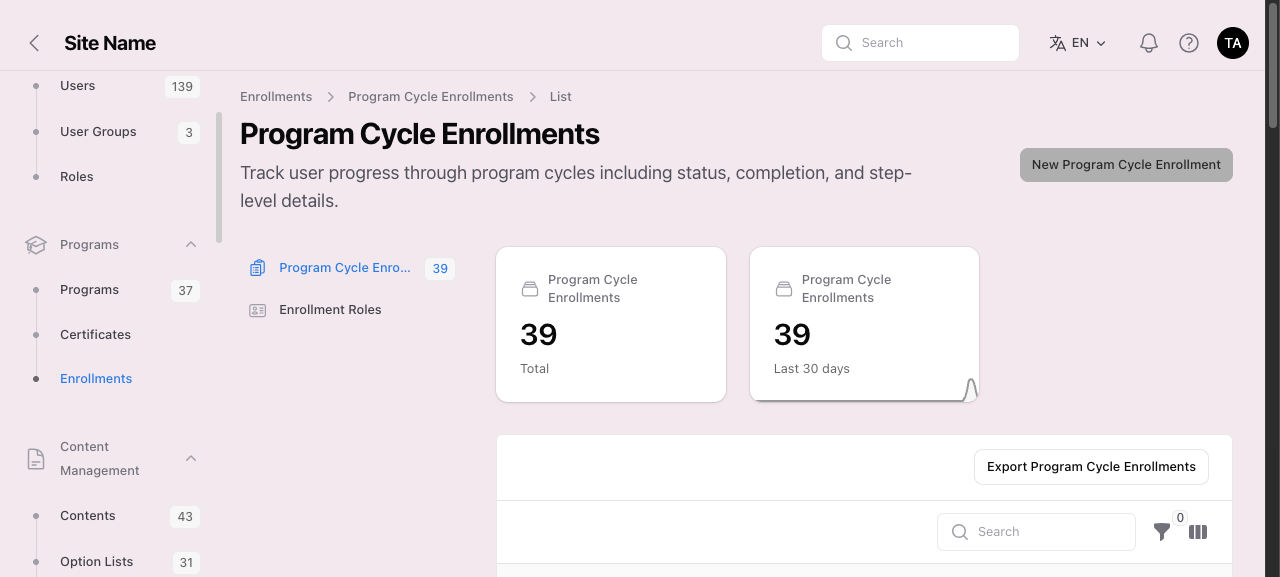 Programs → Enrollments. Each row is one user's enrollment in one cycle.
Click a row to open that enrollment. The detail page shows the user's overall status, date overrides, and the Step Progress table. For what each status means and how enrollments move between them, see Enrollment statuses & transitions.
Export an enrollment report
To keep or share a printable record of one enrollment, click Export Report at the top of the enrollment's page. Your browser downloads a PDF named enrollment-<id>-<date>.pdf.
 Export Report sits beside Edit Enrollment and Re-evaluate Status.
The report contains:
- A summary — enrollment ID, the user's name and member number, program, cycle, role, path, status, when they enrolled, last visited and completed, and the enrollment's effective start, deadline, grace period and extension dates.
- Steps — one row per step, in step order, with the same status and dates as the Step Progress table.
Dates and times are shown in your site's time zone. Your site logo appears at the top when it is a PNG or JPG image, and your site name appears at the foot of each page. Comments, the activity timeline and step submissions are not included.
Anyone who can open an enrollment can export it.
Step Progress
The Step Progress table lists every step in the enrollment with its status, start, last-accessed, and completion dates, and any release or due dates. For what each step status means and how steps move between them, see Step statuses.
Per-row actions
Each step row has a single Actions menu (the ⋮ button at the end of the row). Open it to act on that step.
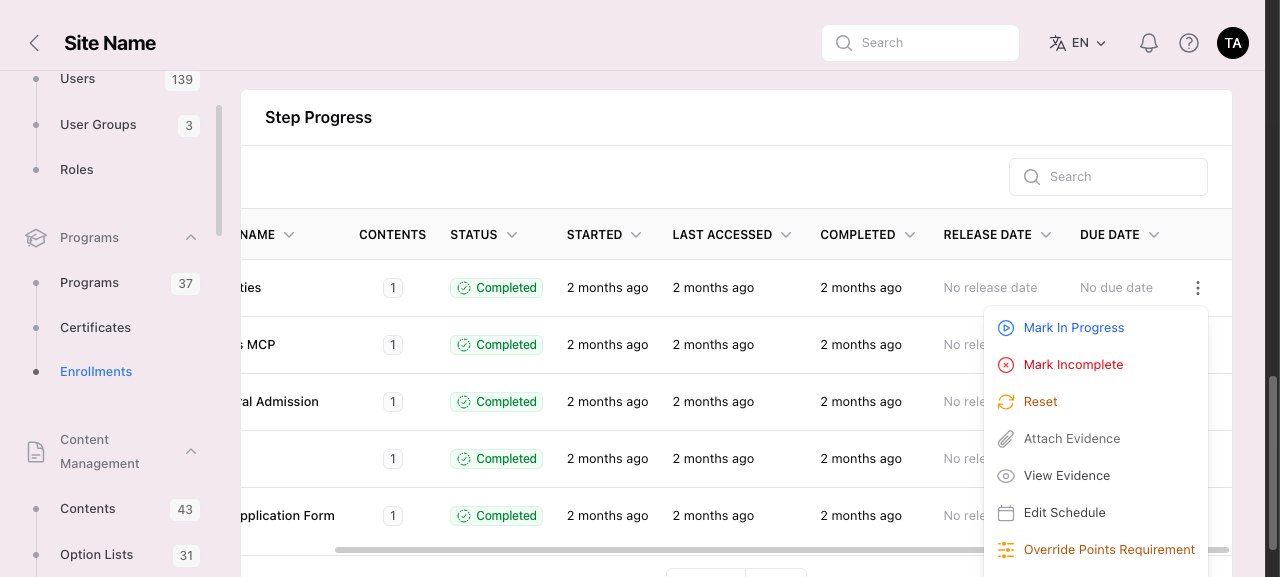 Every per-step action lives in one dropdown, including the evidence actions.
Where did the buttons go?
The per-step actions used to sit as separate buttons across the row. They are now grouped into this single Actions dropdown to keep the table readable. Nothing was removed — every action is still here.
The menu adapts to the step's current status, so you'll only see actions that apply:
- Mark Complete / Mark In Progress / Mark Incomplete — set the step's status manually.
- Unsubmit Goals — on a Learning Portfolio step that is still open (so Mark In Progress isn't offered), un-submit just the goals you pick and leave the rest submitted. See Unsubmit submitted goals.
- Reset — clear the step's progress so the user starts it again.
- Attach Evidence / View Evidence — add or review evidence recorded against the step.
- Check Not Current — on a Learning Portfolio step configured with Period Completion Rules and Reset Goal Status to Not Current, run that reset now for this one enrollment: goals whose measured phase date is stale are set to Not Current, and the step (and enrollment) reopen if the reset drops them below their requirements. It does exactly what the nightly reset does, scoped to this enrollment, and only appears when that portfolio has the feature enabled.
- Reopen Approved Activities — on an Activities step, unlock specific approved activities so the user can edit them. See below.
- Edit Schedule — override the step's release or due dates for this user.
- Override Points Requirement — adjust the points the step requires to complete.
- Delete — remove the step from this enrollment.
Reopen approved activities
An approved activity is locked — the user can't edit it. So on an Activities step, reopening asks you which approvals to unlock instead of clearing them all.
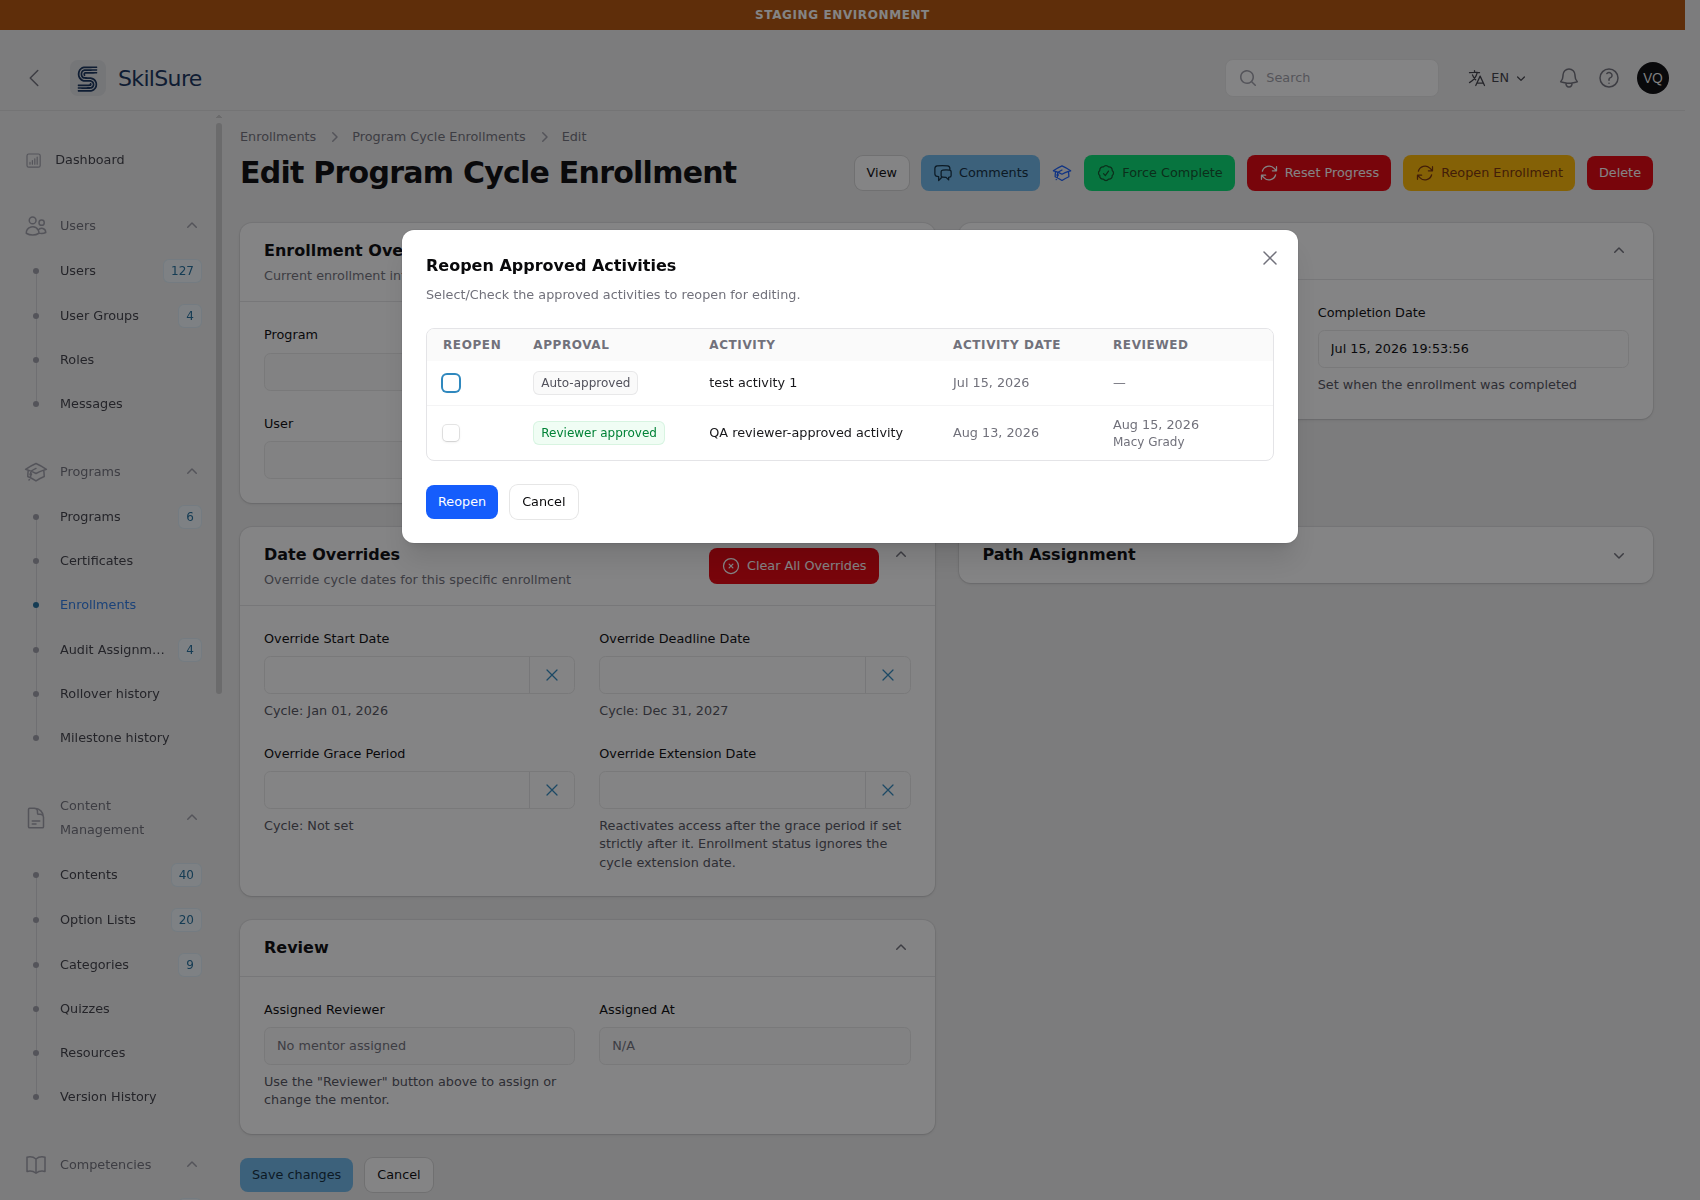 Choosing which approvals to unlock. The Approval column separates a reviewer's decision from an automatic approval.
Mark In Progress on an Activities step opens this dialog first, then marks the step in progress as usual. If the step has no approved activities there's nothing to choose, so you get the normal confirm dialog instead.
When the step is already in progress — so Mark In Progress isn't offered — the same dialog is available on its own as Reopen Approved Activities. That one only unlocks the activities you pick; it doesn't change the step's status.
- Tick only what you want unlocked. Anything you leave unchecked keeps its approval. You must tick at least one.
- The Approval column tells you what you're undoing: Reviewer approved means a person made that decision (their name and date are shown), Auto-approved means the activity was approved automatically because this content has review turned off.
- Activities that are submitted or under review are always returned to draft, whatever you tick — they're still in flight, not decided.
Users can do this themselves
If the step has Enable Allow User Reopen Step turned on, the user gets the same dialog when they reopen a finished step — but it only offers them auto-approved activities. A decision a reviewer made is yours to undo, not theirs.
Enable user Reopen Activity gives them the same picker on a step that is still In Progress, from a Reopen Activity button beside Log Activity. Same rule: automatic approvals only. The two toggles are independent — see the comparison table on that page.
WARNING
These actions change a real user's progress immediately. Resetting or deleting a step cannot be undone — use them deliberately.
Assign a reviewer
A reviewer is the person who reviews a user's work on an enrollment: the user's submissions show up on the reviewer's Review Dashboard. The reviewer role is called Mentor by default, and your organization may display it under its own name (for example Peer Coach).
There are two ways to assign one:
- Assign Reviewer: one reviewer on one enrollment. Use this in most cases.
- Enrollment Roles: one person on many enrollments at once, under any provider role, with control over what they see on the Review Dashboard. See Assign roles in bulk.
1. Give the person a reviewer role
You only need to do this once per reviewer. Open Users → Users, open the person's record, and add Mentor under Provider Roles. Save.
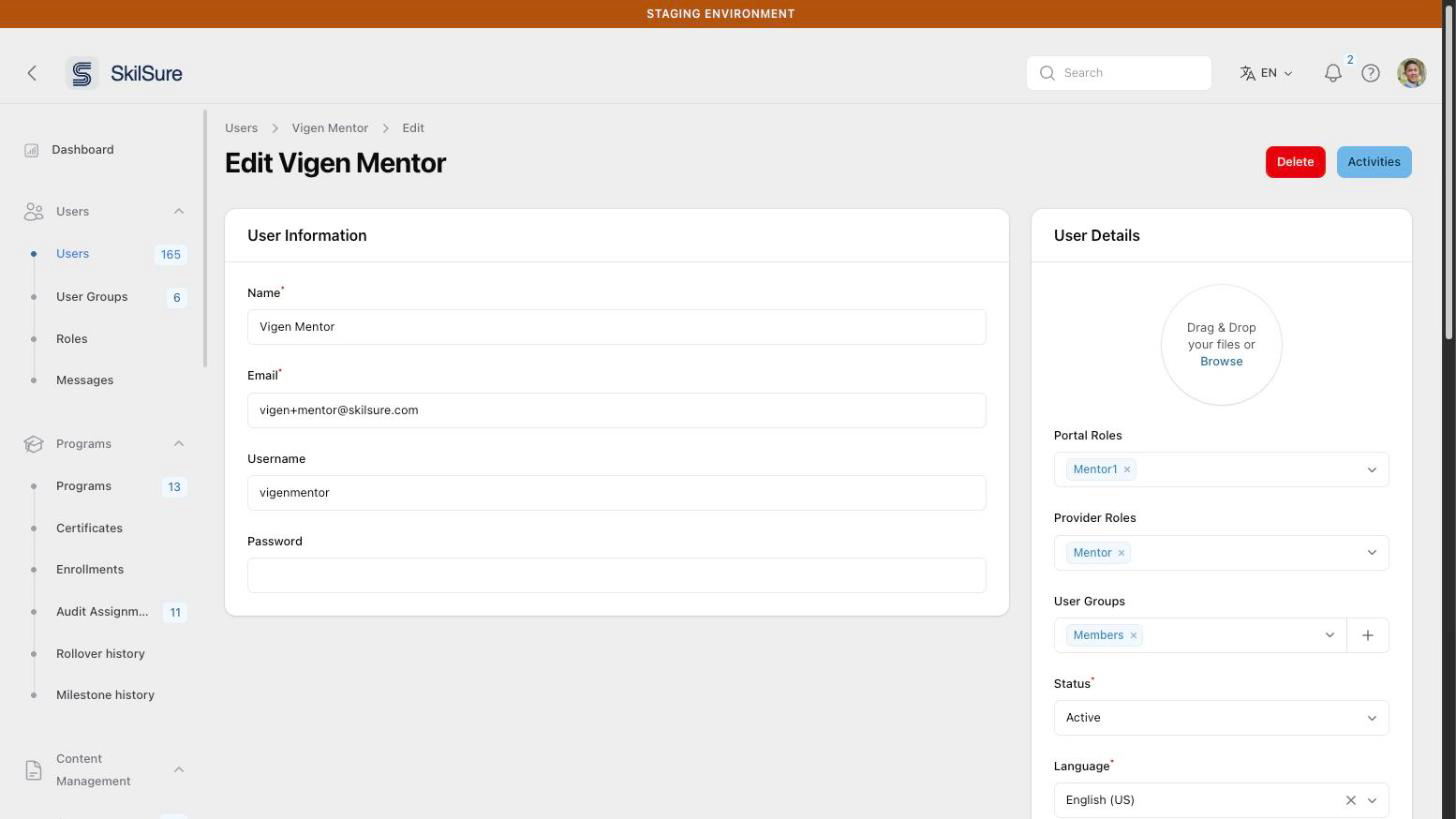 Users → Users → Edit. Provider Roles lists roles by their internal name, so a renamed reviewer role still appears here as Mentor.
Only people who hold a reviewer role can be picked as a reviewer.
2. Assign them to the enrollment
- Open Programs → Enrollments and find the user's enrollment in the right program cycle. Search by name, or filter by cycle.
- Open the row's Actions menu (⋮) and choose Assign Reviewer. On an open enrollment, the same action is under the Reviewer button at the top of the page.
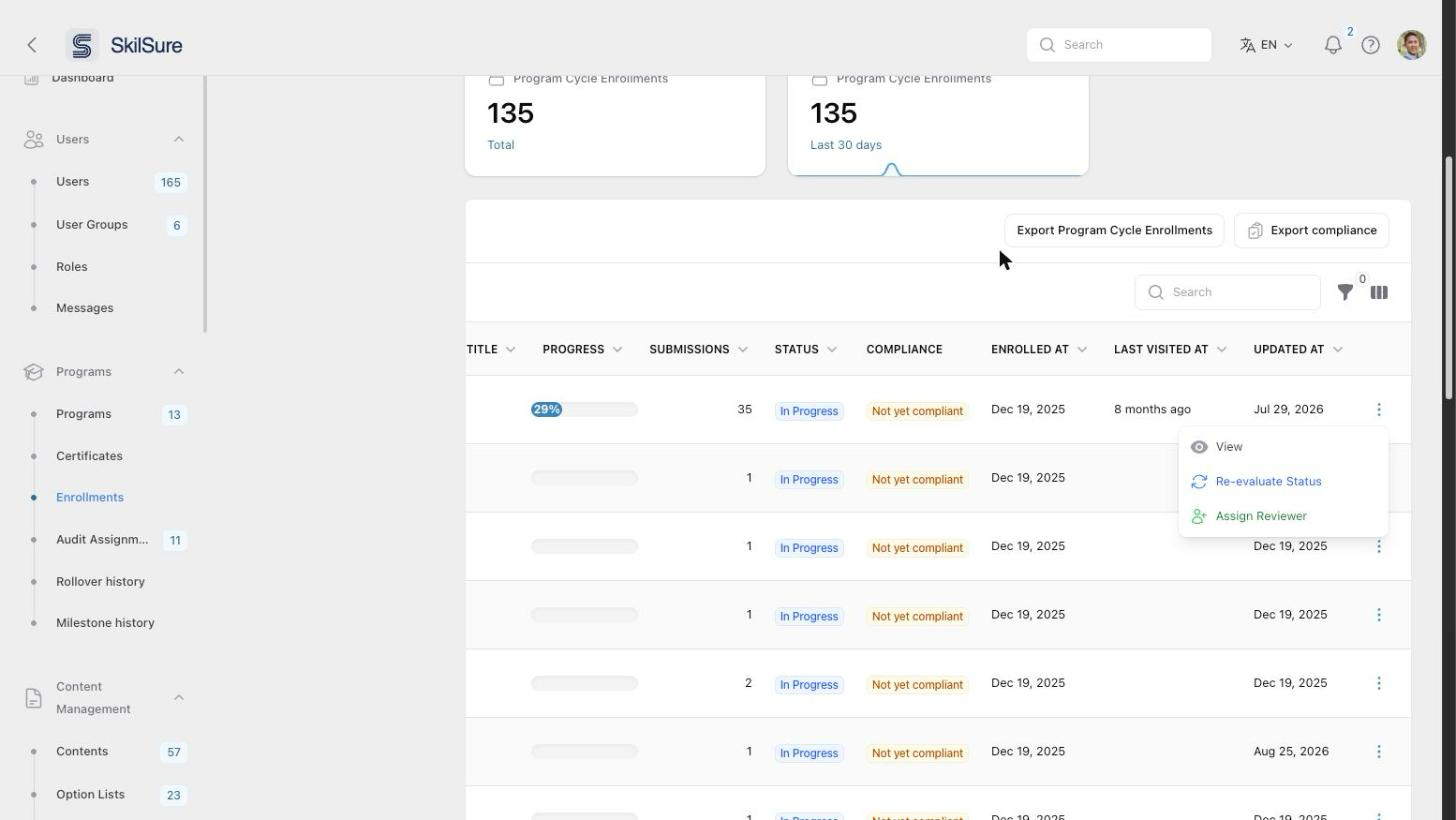 Programs → Enrollments. Assign Reviewer is in each row's Actions menu.
- Pick the reviewer from the Reviewer list, which shows each person's name and email, and click Submit.
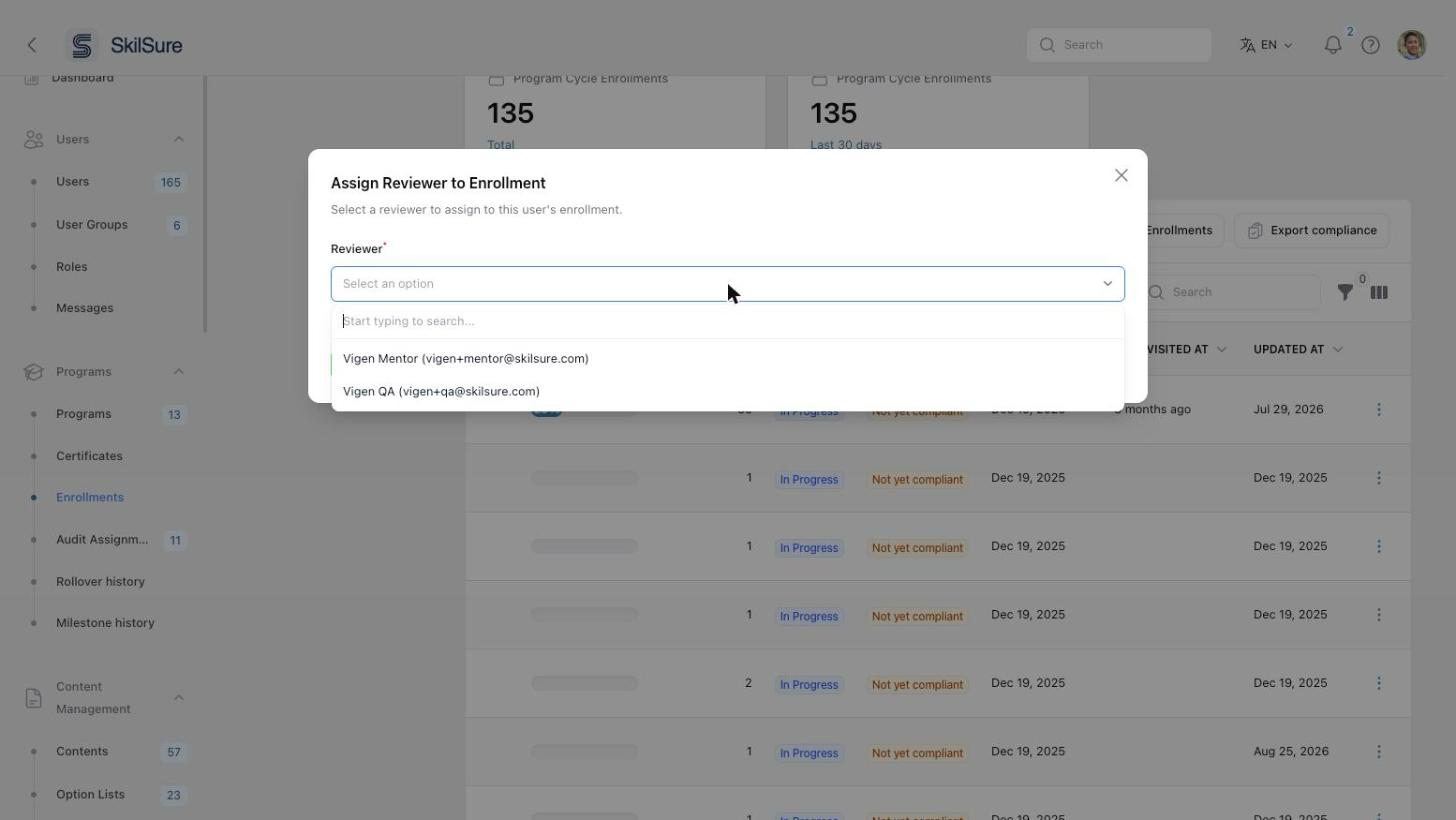 Search the list by name or email.
The reviewer now sees the user on their Review Dashboard. Anything the user has already submitted is queued there for review straight away.
No email is sent
Assigning a reviewer does not notify the reviewer or the user. Let the reviewer know yourself.
To change a reviewer, choose Unassign Reviewer from the same menu, then assign the new one.
Reviewer not in the list?
Either they don't hold a reviewer role yet (step 1), or they already have the maximum number of users a reviewer can take.
Assign roles in bulk (Enrollment Roles)
Open Programs → Enrollments → Enrollment Roles. The list shows every role assignment in your tenant: who holds it, the role, the program and cycle, the user it applies to, and what that person sees on the Review Dashboard. Use it to review assignments, edit their dashboard settings, or delete them.
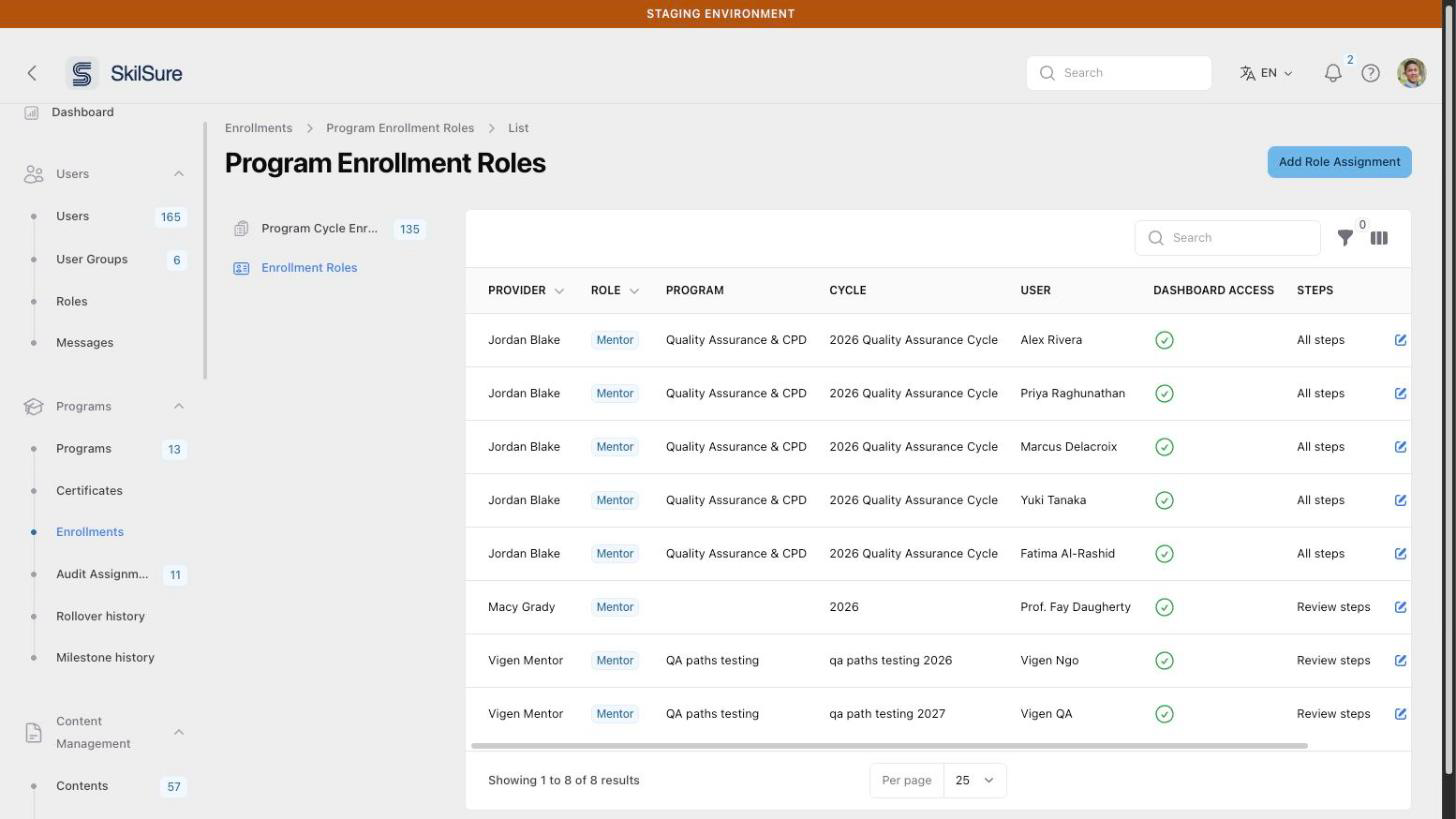 Programs → Enrollments → Enrollment Roles. The Steps column shows what each person sees on their Review Dashboard.
To assign one person to several enrollments at once, click Add Role Assignment and work through the three steps:
- Program: choose the program.
- Role & Provider: choose a Provider Role and then the person. Any provider role can be used here, not only the reviewer role, so this is also how you assign an Assessor or Supervisor.
- Enrollments: search for and select the enrollments by user name, email or enrollment ID. Enrollments that already have this person in this role are left out.
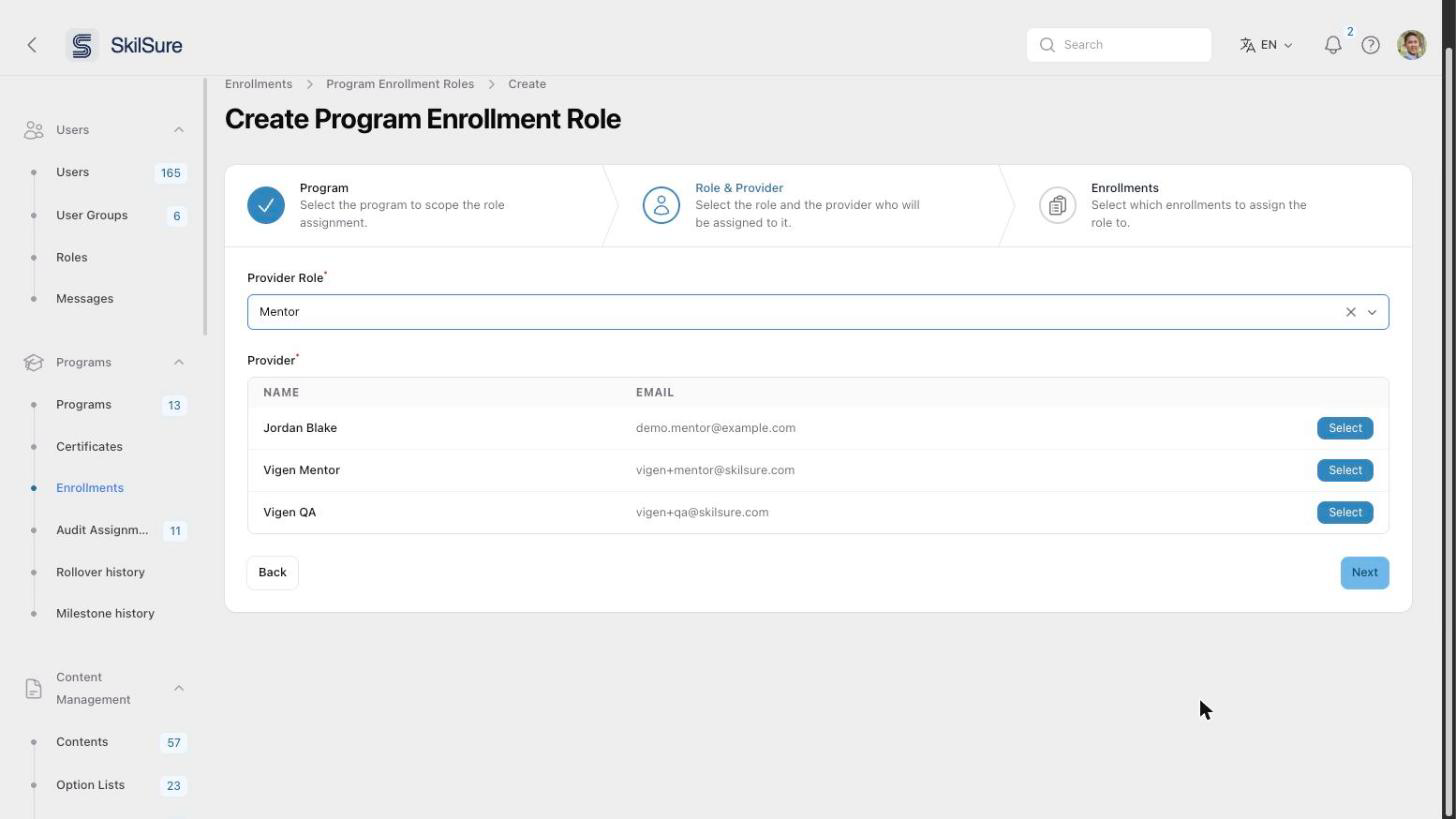 Role & Provider. Only people who hold the chosen role are listed.
Before you click Assign Roles, open Review Dashboard Settings to choose what the person can see:
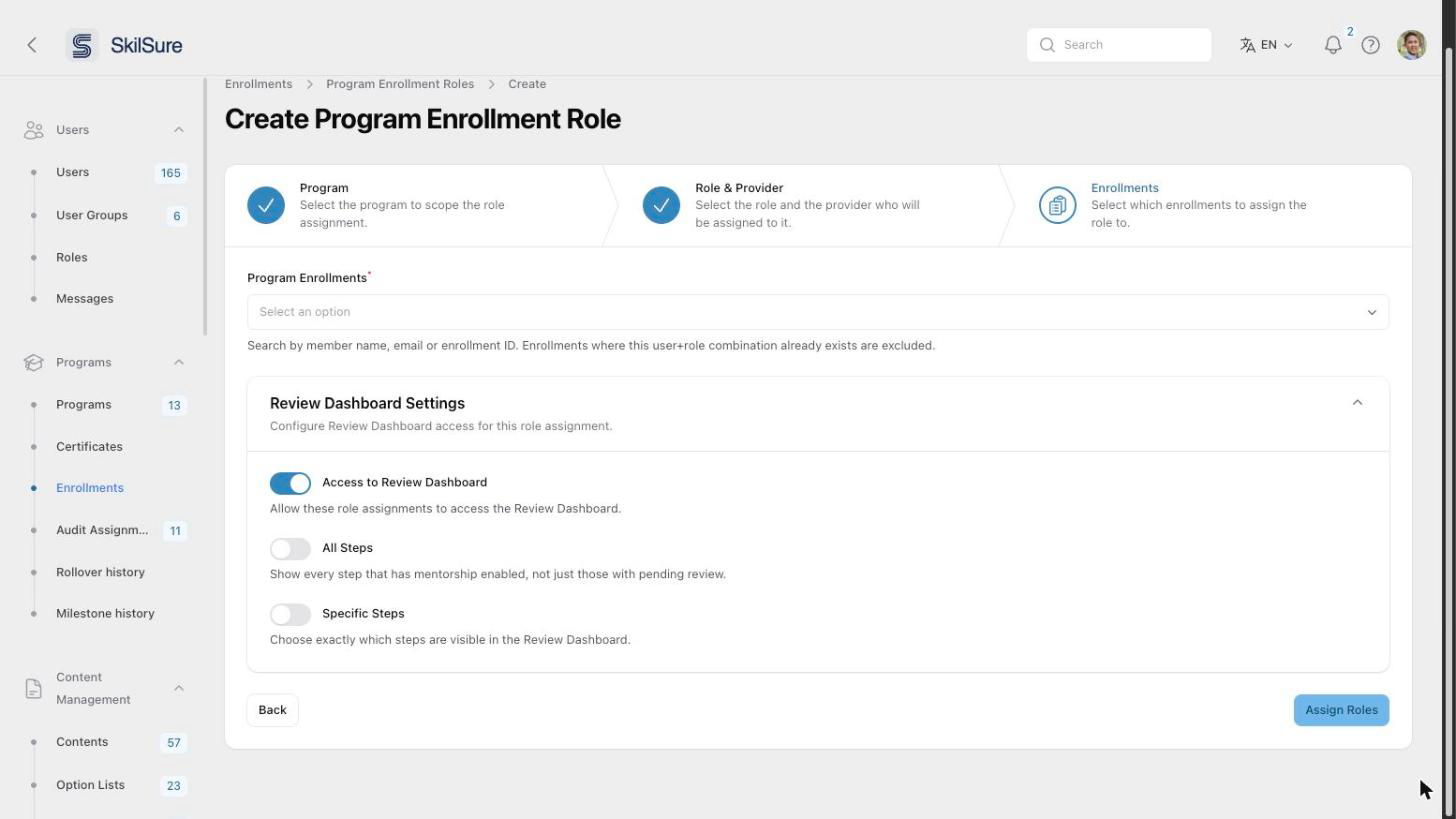 Enrollments. The dashboard settings apply to every enrollment you selected.
- Access to Review Dashboard: on by default. Turn it off and the user won't appear on this person's dashboard at all.
- All Steps: show every step that has review enabled, not only the steps waiting for review.
- Specific Steps: pick exactly which steps are visible.
With both step toggles off, the dashboard shows only steps waiting for review (listed as Review steps).
Existing submissions are not queued
Assign Roles creates the assignments but does not queue work the user has already submitted. For a reviewer, that earlier work only reaches their dashboard once the user resubmits it or the reviewer opens it. If the user has already submitted, use Assign Reviewer instead.
Editing an assignment
When you edit an existing assignment, the Provider Role and Provider lists only offer people registered as providers for that program cycle. Register them under Programs → (program) → Providers. You don't need to register reviewers there to use Assign Reviewer or Add Role Assignment.